10 Simple Yoga Poses for Beginners to Try
Yoga has been around for centuries, offering numerous benefits for both physical and mental health. However, if you’re new to the practice, it can be intimidating to start. The good news is that you don’t need to be an expert to enjoy yoga. In fact, there are plenty of simple poses that you can try out as a beginner to help you get started. Here are ten basic yoga poses that you can try at home today.
- 1) The Importance of Breathing
- 2) Mountain Pose
- 3) Warrior I
- 4) Downward Facing Dog
- 5) Triangle Pose
- 6) Half Camel Pose
- 7) Seated Twist Pose
- 8) Bridge Pose
- 9) Corpse Pose
- 10) Alternate Nostril Breathing
1) The Importance of Breathing

Breathing is a crucial component of yoga practice. Proper breathing techniques help in syncing the mind and body and regulating our emotions. Deep breathing also brings in more oxygen, improves circulation, and releases tension from the body. In yoga, breathing is referred to as pranayama, which means controlling the life force energy within us.
Beginners should focus on slow, deep breathing while practicing yoga. Inhale deeply, filling the lungs with air, and exhale slowly, releasing all the air. Breath should be steady and smooth throughout the practice. Try to sync the movements with the breath, taking deep breaths during stretches and releasing it during compression. Focusing on the breath helps in calming the mind and brings in a meditative state during practice.
Breathing can also be used to release any tension or stress in the body. Whenever you feel discomfort or stress in a pose, take a few deep breaths to ease into the posture. Slowly inhale and exhale, visualizing the stress leaving the body with every breath.
In summary, breathing is an essential aspect of yoga practice, which helps in syncing the mind and body, improving oxygen intake, and calming the mind. As a beginner, focusing on proper breathing techniques can help in achieving a meditative state and enhancing the benefits of the practice.
2) Mountain Pose
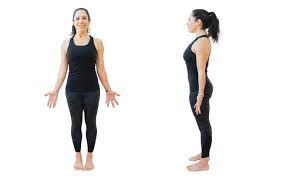
The Mountain Pose, also known as Tadasana, is a basic yoga pose that is often used as the starting point for other standing poses. This pose helps to improve posture and align the body properly.
To practice the Mountain Pose, begin by standing at the edge of your mat with your feet hip-width apart. Engage your core and press your feet firmly into the ground. Keep your shoulders relaxed and roll them back. Tuck your chin in slightly and gaze straight ahead.
As you inhale, reach your arms up towards the sky and stretch your fingertips towards the ceiling. Keep your palms facing each other and your shoulders relaxed. Exhale and release your arms down to your sides.
Repeat this pose a few times, focusing on your breath and maintaining good posture. You may also want to try closing your eyes and imagining yourself as a mountain – strong and grounded.
The Mountain Pose is a great way to start your yoga practice, as it helps you to become more mindful and centered. By practicing this pose regularly, you will begin to feel more stable and balanced in both your physical and mental states.
3) Warrior I
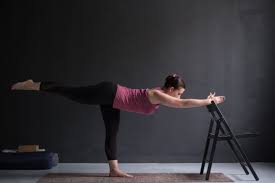
The Warrior I pose is an empowering and grounding posture that strengthens the legs, hips, and shoulders while also opening the chest and heart center. To begin, start in the Mountain pose with your feet hip-distance apart and arms by your sides. Step your left foot back about 3-4 feet, keeping your left toes pointing towards the top left corner of your mat.
Turn your left foot out at a 45-degree angle and firmly ground it into the mat. Square your hips towards the front of the mat and bend your right knee, ensuring it stays directly above your ankle. Engage your core and lift your arms overhead, palms facing each other.
As you breathe deeply, imagine sending your energy and focus down into the earth through your grounded left foot and up towards the sky through your fingertips. Hold this pose for several breaths before switching sides.
Remember to listen to your body and only push yourself to your comfortable limit. If you feel any discomfort or pain, gently release the pose and come back to a neutral standing position. With regular practice, Warrior I can help build strength and balance, as well as promote a sense of inner confidence and courage.
4) Downward Facing Dog
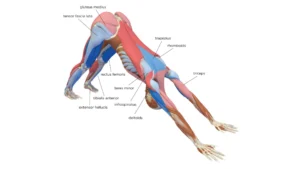
Downward Facing Dog is one of the most popular yoga poses for beginners. It is a great way to stretch your back, hamstrings, and calves, and can help alleviate stress and anxiety.
To start, come onto your hands and knees. Your hands should be shoulder-width apart and your knees should be hip-width apart. Spread your fingers wide and press into your hands to lift your hips up and back. Your body should be in an upside-down V-shape.
Try to keep your heels on the ground, but if they don’t reach, that’s okay. You can also bend your knees slightly if you need to.
Make sure to breathe deeply in this pose. Inhale through your nose and exhale through your mouth. Hold this pose for a few breaths before releasing.
If you have wrist pain, you can modify this pose by coming onto your forearms instead of your hands. This is called Dolphin Pose and still provides a great stretch for your body.
Remember to listen to your body and take breaks as needed. Downward Facing Dog is a great pose to incorporate into your yoga practice and can also be done outside of yoga to stretch and relieve tension in your body.
5) Triangle Pose
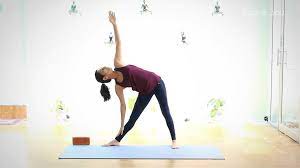
Triangle Pose, or Trikonasana in Sanskrit, is another foundational yoga pose that is great for strengthening the legs and opening up the hips.
Here’s how to do it:
- Begin in Mountain Pose (see earlier in the post for instructions).
- Step your feet about 3 to 4 feet apart.
- Turn your left foot in slightly and your right foot out 90 degrees.
- Reach your right arm forward and hinge at your right hip to lower your right hand down towards your shin or the floor.
- Stretch your left arm up towards the ceiling and gaze up at your left hand.
- Keep your left hip stacked over your right hip and engage your core.
- Hold for a few breaths, then switch sides.
This pose helps to stretch and strengthen the legs, hips, and spine. It can also improve balance and concentration.
As with any yoga pose, it’s important to listen to your body and only go as far as is comfortable for you. Don’t push yourself too hard or try to force your body into any position that doesn’t feel good. Remember to breathe deeply throughout the pose, and always feel free to modify or adjust as needed.
6) Half Camel Pose
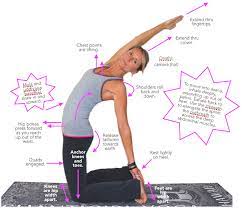
Half Camel Pose is a beginner-friendly backbend that opens up the chest and shoulders, and stretches the front of the body. This pose is a great way to relieve tension in the upper back, neck, and shoulders.
To get into the pose, begin on your hands and knees with your shoulders stacked above your wrists and your hips over your knees. Reach your right hand back to grab your right heel. Keep your left hand on your left hip and engage your core to lift your chest and look up towards the ceiling. Hold the pose for a few breaths before releasing and switching sides.
Remember to listen to your body and only go as far as you feel comfortable. You can also use a block or bolster to support your lower back or knees. Half Camel Pose is a great way to open up your heart center and energize your body.
7) Seated Twist Pose
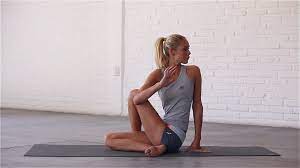
Another excellent pose for beginners is the Seated Twist Pose. This pose is perfect for relieving tension in the back, neck, and shoulders. It also improves digestion, reduces stress, and helps to detoxify the body.
To perform this pose, sit on the floor with your legs crossed. Make sure your back is straight and your feet are firmly planted on the ground. Place your right hand on your left knee, and your left hand on the floor behind you. As you inhale, lengthen your spine, and as you exhale, gently twist your upper body to the left. Hold for a few breaths, and then switch sides.
Remember to keep your spine straight throughout the pose and avoid twisting too far. If you have any back or spinal injuries, you should avoid this pose or consult with a yoga teacher before attempting it.
Practice this pose regularly to improve your flexibility and overall well-being. You can even do this pose at work or while sitting on the couch to alleviate tension and stress. Happy twisting!
8) Bridge Pose

Bridge Pose, also known as Setu Bandhasana, is a gentle backbend that strengthens the core, legs, and buttocks. This pose helps to relieve stress and anxiety by stretching and opening up the chest and hips.
To begin, lie on your back with your arms at your sides and your knees bent, feet flat on the ground. As you inhale, press your feet into the floor and lift your hips off the ground. Roll your shoulders back and underneath you, clasping your hands together if you like. Keep your feet hip-distance apart and press your thighs together. Breathe deeply and hold the pose for several breaths.
To release, slowly lower your hips back to the ground and roll your spine down one vertebrae at a time. Repeat the pose two more times, holding for longer each time if you feel comfortable.
Bridge Pose can be modified for beginners by placing a block under your hips or keeping your hands on the ground. If you have neck problems, keep your head on the ground or use a rolled-up towel to support your neck.
Remember to listen to your body and go at your own pace. As you continue to practice Bridge Pose, you may notice increased flexibility and strength in your core and back muscles.
9) Corpse Pose
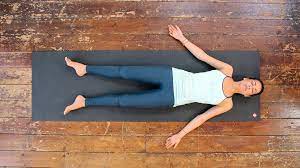
Corpse Pose, also known as Savasana, is a pose of complete relaxation. It may seem easy, but it’s actually quite difficult to let go of tension and thoughts, especially if you’re a beginner. This pose is usually done at the end of a yoga practice to help calm the mind and allow the body to fully absorb the benefits of the practice.
To do the pose, lie down on your back with your legs slightly apart and your arms at your sides, palms facing up. Close your eyes and breathe deeply, letting your body sink into the floor. Focus on relaxing each part of your body, starting with your toes and working your way up to your head. Let go of any tension, thoughts or worries.
Stay in the pose for at least 5 minutes or longer if you like. When you’re ready to come out of the pose, slowly wiggle your fingers and toes, take a few deep breaths, and roll onto your right side for a few more breaths. Then, using your right arm, press yourself up to a seated position.
Corpse Pose is a great way to end a yoga practice and to reduce stress and anxiety. It can also help improve sleep quality and reduce fatigue. Don’t rush out of this pose, take your time to fully relax and enjoy the benefits.
10) Alternate Nostril Breathing
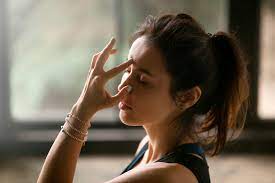
Alternate nostril breathing is a great way to help calm the mind and reduce stress levels. This breathing technique involves inhaling through one nostril while closing the other with your finger, then exhaling through the opposite nostril while keeping the other closed.
To do this pose, sit in a comfortable cross-legged position with your back straight. Rest your left hand on your left knee, and bring your right hand to your face. Use your thumb to close your right nostril and inhale deeply through your left nostril. Then, close your left nostril with your ring finger, release your thumb, and exhale through your right nostril.
After exhaling completely, inhale through your right nostril, then close it with your thumb and exhale through your left nostril. This completes one cycle. You can continue for 5-10 cycles, then release your hand and breathe normally.
Alternate nostril breathing can help balance the left and right hemispheres of the brain, promote relaxation, and increase mental clarity. It’s a great practice to do at the beginning or end of a yoga session, or anytime you need a moment of calm and focus.
